

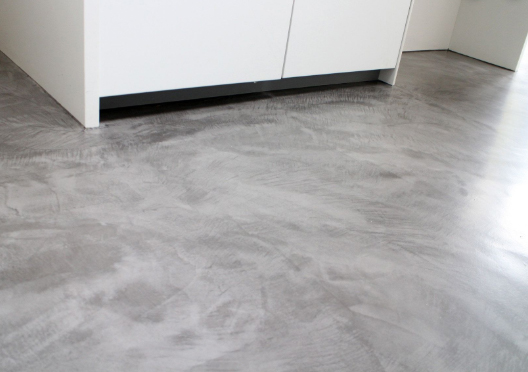
Microcement is a versatile, highly durable, and aesthetically pleasing material that can be used in a wide range of applications, from flooring and walls to furniture like a concrete coffee table.
This beginner’s guide will walk you through the process of applying microcement, including the necessary supplies, surface preparation, and application techniques.
Supplies Needed
Before starting your micro cement project, gather the necessary materials and tools:

- Microcement mix
- Primer
- Mixing tools (bucket, paddle mixer, or drill attachment)
- Trowels and rollers
- Sandpaper (120 and 240 grit)
- Protective gear (gloves, mask, and goggles)
Be sure to choose the right micro cement product for your project, as different products have varying properties and application techniques.
Surface Preparation
Proper surface preparation is essential for a successful micro cement application. To ensure a strong bond between the micro cement and the surface, follow these steps:
- Cleaning: Remove any dust, dirt, or debris from the surface using a broom, vacuum, or damp cloth. For stubborn stains or contaminants, use a mild detergent and rinse thoroughly with water.
- Repairing: Inspect the surface for any cracks or holes that need to be repaired. Use a suitable filler or repair mortar compatible with microcement. Allow the repair material to dry completely before proceeding.
- Surface leveling: If necessary, level the surface to eliminate any uneven areas. This step will help achieve a smooth and uniform finish when applying the micro cement.
- Priming: Choose a primer specifically designed for microcement applications. Apply the primer to the surface, following the manufacturer’s instructions. The primer will enhance adhesion, prevent the absorption of moisture, and promote a more uniform finish. Allow the primer to dry for the recommended time before applying the microcement.
Mixing Microcement
To ensure a smooth and consistent microcement mixture, follow these guidelines:
- Proportions: Consult the manufacturer’s instructions for the correct proportions of microcement powder, water, and any color pigments. Adhering to the recommended ratios will ensure optimal performance and durability.
- Mixing process: Use a clean bucket and a paddle mixer or drill attachment to mix the microcement. Begin by adding the required amount of water and color pigments (if desired), followed by the microcement powder. Mix thoroughly for several minutes until you achieve a lump-free, homogeneous consistency.
- Mixing tips: Make sure to scrape the sides and bottom of the mixing bucket during the process to incorporate any unmixed powder. Avoid adding too much water, as this can weaken the microcement and cause shrinkage or cracking.
- Resting period: Allow the mixed microcement to rest for a short period, as recommended by the manufacturer. This step will help the mixture achieve a more uniform consistency and make it easier to apply.
- Re-mixing: Before applying the microcement, give the mixture a final stir to ensure an even consistency. Remember to mix periodically during application to maintain uniformity.
Applying Microcement – Step by Step
To achieve a professional and durable micro cement finish, follow these detailed application steps:
A. First layer application
- Choose the right tool: Depending on the surface and desired texture, use either a stainless steel trowel or a roller to apply the microcement. Trowels are best for achieving a smooth, polished finish, while rollers are better suited for textured surfaces.
- Application technique: Apply the first layer of microcement to the primed surface, working in small sections. Hold the trowel at a slight angle, spreading the material evenly across the surface. Maintain a consistent thickness throughout the application, typically around 1-2mm for the first layer.
- Working time: Be mindful of the microcement’s working time, as it can dry quickly. Work efficiently and avoid overworking the material, which can lead to imperfections in the finish.
B. Second layer application
- Drying time: Allow the first layer to dry for the recommended time, usually between 12-24 hours, depending on the product and environmental conditions. The surface should be dry to the touch and free from any tackiness.
- Application technique: Using the same tool as before, apply a second layer of microcement over the first. This layer provides additional strength and allows you to achieve your desired texture. Maintain a consistent thickness, generally around 1-2mm for the second layer as well.
- Creating texture: If desired, use different trowel techniques or specialized tools to create various textures and patterns on the surface during the second layer application.
C. Finishing touches
- Sanding: Once the second layer has dried, use 120-grit sandpaper to remove any imperfections and level the surface. Follow up with 240-grit sandpaper for a smooth finish. Take care not to sand too aggressively, as this can expose the underlying layer or damage the surface.
- Cleaning: Remove any sanding dust or debris from the surface using a vacuum or damp cloth.
- Protective sealer: Apply a protective sealer to the microcement surface to enhance its durability and resistance to water, stains, and abrasion. Choose a sealer compatible with microcement and follow the manufacturer’s instructions for application and drying time.
- Buffing (optional): For a high-gloss finish, use a buffing machine with a fine polishing pad to polish the sealed surface after the sealer has dried.
Also read: Planning to build a house? Here are 5 stores that can save you money
D. Curing:
Allow the microcement to fully cure according to the manufacturer’s recommendations before subjecting it to heavy use or stress. Proper curing is essential for achieving optimal performance and durability.
Conclusion
In conclusion, applying microcement is a relatively straightforward process that, with the proper preparation, tools, and techniques, can yield stunning results for various surfaces and applications, including a stylish concrete coffee table. By following the steps outlined in this guide, even beginners can successfully undertake microcement projects and create durable, visually appealing finishes.
As you gain experience and confidence, you’ll be able to explore the vast range of creative possibilities that microcement offers, transforming spaces and objects with this versatile material.